Despite what could be accurately described as a "cautious demeanor," I've learned to accept that there are some risks in this world worth taking. Our kids, for one (or three). Quitting my desk job to start our own business for another. Making hash browns.
Hash browns are one of those things I've never been able to get right because I never bothered to learn how to make them right. I maybe tried twice and, while the results were still tasty (I mean, a fried potato is a fried potato), the resulting mess of starchy mush was in no way a proper "hash brown."
Last night, as I was holding my baby boy and watching some "Buffy the Vampire Slayer," I started thinking about future breakfasts in this hypothetical farm on which we've hung both our hopes and dreams. We've taken some mighty strides away from boxed cereals and other processed breakfast fare, with homemade granola being our lazy-morning meal, so the next step in our goal to gain near-complete control over our diet is growing our own food--we're deadly serious about having egg-laying chickens someday, and our limited success in our little gardens superseded the failures and made us want to grow way more (if not all) of our own fruits and vegetables. Homegrown potatoes fed us for a few weeks this summer, so my thoughts turned to a breakfast of eggs and potatoes...hash browns.
My wife and I are learning how to cook--it wasn't a skill passed down to either of us from our parents, so we're finding our own way. That means we burn some meals, some dishes turn out painfully bland, and we sometimes sit down to happy surprises--you want every meal to delight the palette, but learning curves don't tend to work like that. But a recent experience with omelets, of all things, taught us that one little word in an online recipe--"cover," in the case of omelets--can nullify all previous failures and put a new dish into regular rotation.
I mean, it makes sense that you'd have to get the moisture out of potatoes if you want them to stick together and form a patty. Or does it? I don't know, cooking doesn't make that much sense to me, but when I Googled "hash browns" and read that you have to squeeze that water out--well, I can follow a direction. This morning I popped the shredder attachment onto the mixer (my current obsession with slicing and shredding foodstuffs in that thing also played into the decision to make hash browns, and not just a little bit) and, following directions from the Internet, I squeezed the hell out of those potato shreds before tossing them into the pan of oil. And it worked--they surely weren't the best hash browns ever made (and not just because I didn't have any lard on hand), but they were the best hash browns I've ever made.
I'm trying really hard to avoid the metaphor "gotta break a few eggs to make an omelet," but, you know...you do. You have to mess up to appreciate finally getting something right, have to go through lean years to appreciate when times are good, have to know a kid's cry to really cherish his or her laugh. I'm trying to stay really aware of this right now, as we ready ourselves to start a new chapter in our life--turning the page on years of failure and successes, diving into a whole new set of missteps and (hopefully) accomplishments. Broken eggshells, hard-won omelets, and pretty okay hash browns.

"We all have hometown appetites. Every other person is a bundle of longing for the simplicities of good taste once enjoyed on the farm or in the hometown they left behind." --Clementine Paddleford
Thursday, December 8, 2011
Monday, November 21, 2011
Renaming
Tonight I named dinner. I have noticed that with children, at least mine, the name and color and even the proximity of each item on a plate can make or break a dinnertime battle. So tonight we ate Apple Medley. If I had even whispered the word Pork Shoulder, I am fairly positive that no one would have touched their dinner.
Anyway, last week I threw pork shoulder, potato and carrots in the crock pot with some apple cider. It's delicious and requires almost no prep work. But, we had a lot of meat leftover so tonight's agenda was to use it up before it turned into a science project. I do think any meat would be great with this dish...chicken, steak, sausage--whatever you have on hand.
I love this dish because it is super quick.

Apple Medley
ingredients
1-2 Tablespoons extra virgin olive oil
1 clove of garlic, finely chopped
1/4 of an onion, chopped
2 Cups cooked pork shoulder, cubed
1 Cup fresh spinach, chopped
2 apples, chopped
2 strips of cooked bacon, crumbled
1-2 Tablespoons cinnamon
1 Cup couscous
1 Cup water
1 Cup shredded gouda cheese (optional)
directions
1. In a medium pan saute onions and garlic in extra virgin olive oil until tender. Add meat, spinach, apples and bacon. Add cinnamon to taste.
*If meat begins to stick to the bottom of the pan add a bit of water (just enough to prevent sticking). Drop to a low heat and cover with a lid for 5-10 minutes or until apples are tender.
2. In a small sauce pan bring 1 Cup of water to a boil. Remove from heat. Add 1 Cup of couscous. Lightly toss with fork. Let couscous fluff up, about 5 minutes.
3. Combine couscous and apple mixture together, top with gouda cheese.
Enjoy!
Comfort
Whether you call it seasonal affective disorder, seasonal depression, winter blues, or whatever, it's a real problem up here in Northeastern Ohio, where the sun has taken its annual leave from our days and isn't expected to return until a few months of 2012 have passed. The monochromatic blanket of fleecy gray has been tossed over our landscape and, already, our bodies are struggling to produce enough vitamin D to get our tired and achy frames out of bed.
I think this is where winter food traditions become more than just a way to pass the time--they become an anchor, a reason to haul ourselves out from under the piled quilts and let our feet make contact with the cold, wood floors. And it's not just hunger, which will do its part to drag us into the kitchen eventually, but the making of something that makes us feel good--I think there's something really important to that.
Obviously, this week's big to-do, Thanksgiving, is the archetypical example of cooking for and by tradition, and we'll be knee-deep in flour by mid-morning Thursday with the rest of ya'll. But this past weekend, when dusk and noon were pretty much identical, Carla and I both ended up in the kitchen, letting the oven do the furnace's job and dropping foods ranging from staples to sweets onto the kitchen table.
Am I going to get fat? Oh, hell yeah, but if eating homemade comfort foods actually "comforts" me, it's a lot better than ingesting the nasty chemicals in processed foods or going straight to the source and popping a pill every day to keep that dull ache off my emotional palette.
The fountainhead of food traditions in my life starts with popcorn balls. When I was a kid, as soon as the weather turned cool, my mom would pull out the popcorn and corn syrup and fill our house with the smells of air-popped corn and stovetop candy. (And the popcorn tradition goes back further with her, too, as she told us stories the other day about her dad slipping into the other room and popping up a bowl of fluffy, white goodness for his wife and five children when my mom was knee-high to a grasshopper.)
I asked my mom for her recipe, but she emailed it to the wrong address and I lost the printer paper she eventually handed me, so I'll have to get her index card and transfer the recipe to an index card of my own. But I had some Amish popcorn and all the ingredients so, yesterday, I Googled "popcorn balls" and tried my hand at Paula Deen's recipe. It kinda worked--I have some kinks to work out, but the exploded kernels did hold together, so I'll call them a qualified success. I'll feed them to the kiddos this afternoon and feel all self-satisfied in passing on a family tradition.
If popcorn balls are an old tradition revisited, then these brownies with whipped cream are the tradition du jour in our kitchen. The brownie recipe is solid--I've been thinking about adding some white chocolate chips to the mix to change things up, but there's really no need to mess with that recipe. I can't stop fiddling with the whipped cream, though--I added cinnamon the last time I made the brownies, and last night, thinking of an orange mocha that we make at the shop, I grabbed a bottle of orange extract and the food coloring out of the cabinet and made an orange whipped cream. My goodness, they were good and they looked pretty in candlelight, too.
Monday, November 14, 2011
Dinner in 15 minutes
Kids are weird. Believe us, we've got three and They. Are. Weird.
This is true for so many reasons, but their weirdness really takes center stage at the dinner table. For example, if we set a plate of rice in front of our children, they will turn up their noses and proclaim that they don't like rice. However, if we put a plate of steaming couscous before them, they'll grab their forks and say, "Yummy, rice." If we, as parents, ever took the time to correct them or debate why rice is a no-go while "rice" gets requests for seconds, those days are long gone. The kids eat it, so we buy "rice" in bulk.
But you know what gets old? Plain couscous, that's what. So Carla decided to whip up a 15-minute couscous dish featuring fresh veggies (including some broccoli side shoots from the otherwise dormant garden--despite the cold weather, the broccoli's still going strong) and peanut butter, all things the kids like. They even tasted the stir-fry sauce beforehand and gave it a thumbs-up.
It was delicious, and the little monsters wouldn't even consider eating it because, as you can see, the couscous and the peanut stir-fry were "touching." *Sigh*.
Here's her recipe, which we will make again but serve in separate dishes for the weird ones.

Stir-Fry with peanut sauce and couscous
ingredients
3 cooked chicken breast, chopped
1 small onion, chopped
4 chives, chopped
2 cloves garlic, finely chopped
2 medium carrots, shredded
1 cup broccoli, chopped
1 cup fresh spinach, chopped
2 cups cooked couscous
2 to 4 Tablespoons peanut butter
2 to 3 Tablespoons hoison sauce
1/2 teaspoon rice vinegar
directions
1. Warm oil in pan over a medium high heat. (I use olive oil because it's what I have on hand but peanut oil makes this even tastier.) Toss in onion, chives and garlic. Saute for about minute or two, just don't burn your garlic.
2. Add carrots, spinach, broccoli and cooked chicken. Turn pan to a low heat.
3. Cook until carrots are tender (about 4 or 5 minutes)
4. In a small bowl mix together peanut butter, hoison sauce and rice vinegar until you reach a taste you like. (You can add soy sauce in place of the rice vinegar, but I was out.)
5. Add peanut sauce to your stir fry mix and let the ingredients meld together for about a minute.
5. Serve with couscous mixed in or on the side.
Sunday, November 13, 2011
Baked Potato Soup
The first snow prompts me to start digging through my soup recipes. Most folks go for chili but, to be honest, we still have a huge container in the freezer from the last time we made chili. Our kids aren't huge fans of kidney beans or ground beef, and 50% of them hate tomatoes. So soup it is.
This soup lingers in my head days before I actually make it, which is a huge plus because it does require a little prep work. For instance, when I cook bacon I bake it in the oven and I usually cook a whole pound. I use a little for that morning's breakfast and then keep the rest in a container in the refrigerator for salads, a BLT or, as in this case, for soup.
When the oven is on, I like to use it as much as I can so I tend to powerbake. If I start that morning baking muffins, I will likely make a quick casserole or a bread or something else we will eat during the week so that I'm getting good use out of the energy the stove is producing. On Friday, between baking bread and waiting for the pizza dough to rise, I baked potatoes with this soup in mind for the weekend. (Also I'm horrible about timing and waiting for yeast doughs to do their thing.) This is one of my most favorite wintertime soups, I hope you enjoy it.

Baked Potato Soup
ingredients
9 baked potatoes (I leave the skins on)
3 Cup Water
3 Cup chicken broth
2 Cup half and half
4 strips of cooked bacon, crumbled
2 Tablespoons of herbs (I use thyme & oregano, but use what you like)
1 teaspoon salt
1/2 teaspoon cracked black pepper
1 small onion, chopped
2 cloves of garlic, finely chopped
4 chives, chopped
1 Cup of shredded cheddar cheese
directions
1. Dice potatoes and toss them in the crock pot
2. Add all the remaining ingredients and slow cook for about 8 hours
3. Ladle soup into food processor and blend. Start with 1/4 of the soup and then pour it back into the crockpot. Give it a stir and then continue blending the soup until you reach a consistency you like. Some people like a more brothy potato soup--we are more of a creamy soup family around here, so I usually blend about 80% of the soup.
Some recipes recommend that you saute your onions and garlic first, but I don't taste too much of a difference so I skip this step for the sake of one less dirty pan in the sink.
This is a lot of soup. You will be able to eat this all weekend and maybe even have a bowl or two leftover for lunch on Monday. Enjoy!
Friday, November 11, 2011
Addendum - Cold Frame Repair
I'm not sure how interested you are in the ongoing saga of our attempts to regulate Northeast Ohio's schizophrenic growing season--and I'm fully willing to accept that you're not as invested in it as I am--but in case last night's post about repairing the hoop house cold frame left you wanting some visuals...well, here are some pictures.


See the roof of the house in the background?
That's snow--the cold frame did its job last night.

Here's the ridge along the top. There's a better way to do it,
I know, but I had scrap wood and limited time, and it works.

Ready for the next windstorm!
Thursday, November 10, 2011
Whadda day
Yesterday, the kids and I tromped down to the raised bed to check on our little box of crops inside the hoop house cold frame. We lifted up the plastic and peeked inside to see our carrots, their stalks grown tall and gorgeous; our spinach, green leaves bunched and beautiful; our chives, looking delicious as always. I lowered the structure back over our plants, commented on how great they'll taste at Thanksgiving, and headed back inside.
Then the wind started up. We get a lot of wind up here, so it was no surprise, but I hadn't prepared the hoop house--which is pretty much just a big box kite--for the gusty gales. I checked on it throughout the evening and, despite whipping around, it stayed put for a long time...until it didn't. I handed the baby to my wife, slipped on some sandals, and ran outside in my pajamas to discover a tangle of plastic sheeting and lumber laying in the grass. I sighed, gathered them up, and deposited the mess in the garage.
It didn't frost last night, though, and I'm in no way ready to give up on that garden bed so, after work, I headed to the hardware store and bought five dollars worth of screws, brackets, and clamps and, upon arriving home, immediately set myself to repairing the thing. It didn't take long, the kids were being okay, and there was still light in the sky, so I went ahead and made a few improvements to boot, most notably adding a beam across the top to firm up the structure and securing it with some stakes and rope to keep it grounded the next time the winds start a-whippin'. Just in time, too, because the evil weather people are tossing around the "snow" word in tonight's forecast.
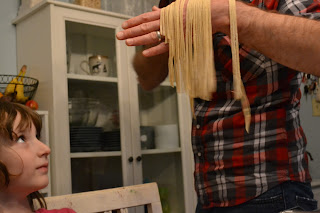
We'd decided to finish off the pasta dough from the other night and, oh boy, it went so much better tonight. Rolled out the dough, fed it into the pasta machine, and cut myself some perfect fettuccine noodles. And, just for the heck of it, I made them crazy long--a few easily measured over two feet long.


Then the wind started up. We get a lot of wind up here, so it was no surprise, but I hadn't prepared the hoop house--which is pretty much just a big box kite--for the gusty gales. I checked on it throughout the evening and, despite whipping around, it stayed put for a long time...until it didn't. I handed the baby to my wife, slipped on some sandals, and ran outside in my pajamas to discover a tangle of plastic sheeting and lumber laying in the grass. I sighed, gathered them up, and deposited the mess in the garage.
It didn't frost last night, though, and I'm in no way ready to give up on that garden bed so, after work, I headed to the hardware store and bought five dollars worth of screws, brackets, and clamps and, upon arriving home, immediately set myself to repairing the thing. It didn't take long, the kids were being okay, and there was still light in the sky, so I went ahead and made a few improvements to boot, most notably adding a beam across the top to firm up the structure and securing it with some stakes and rope to keep it grounded the next time the winds start a-whippin'. Just in time, too, because the evil weather people are tossing around the "snow" word in tonight's forecast.
We'd decided to finish off the pasta dough from the other night and, oh boy, it went so much better tonight. Rolled out the dough, fed it into the pasta machine, and cut myself some perfect fettuccine noodles. And, just for the heck of it, I made them crazy long--a few easily measured over two feet long.

Wee!
Our new discovery that homemade noodles make the box stuff pale in comparison held firm tonight--fettuccine alfredo with homemade pasta? Gah, so good.

We grew that broccoli.

I love this thing.
After dinner, the kids asked me what was for dessert and Carla mentioned that she could go for some cookies. What was I gonna do? Not make those brownies again? We were out of margarine so, with permission, I used the homemade butter, and I added some cinnamon extract to the whipped cream. These little changes created a dessert that was...transcendent? sublime? I can't settle on an appropriate term, but I can tell you it was too good. Too, too good.
This is where the picture of the brownies would be if we
hadn't eaten them all up before I could reach for the camera.
Wednesday, November 9, 2011
Shop
We have made more than we can eat! That's a good thing, right? We have a few of our canned goods available online at Happy Homesteading and locally at Scribbles Coffee Co.


We hope to be adding more to the shop over the next few weeks.


We hope to be adding more to the shop over the next few weeks.
Tuesday, November 8, 2011
Pasta & Cheese
We eat pasta and cheese a lot. Probably more than we should, but it's easy. The kids eat it up with butter, the grown ups get a little bit of olive oil, some garlic and tomatoes. We throw a salad on the side, and dinner is ready.
In an effort to simplify, we have complicated things temporarily. We made our own mozzarella and our own pasta and learned a lot during the experiments. We traded the crying baby back and forth, managed the behavior of two very unruly little girls all while mixing, boiling, hovering over thermometers...but we did it.
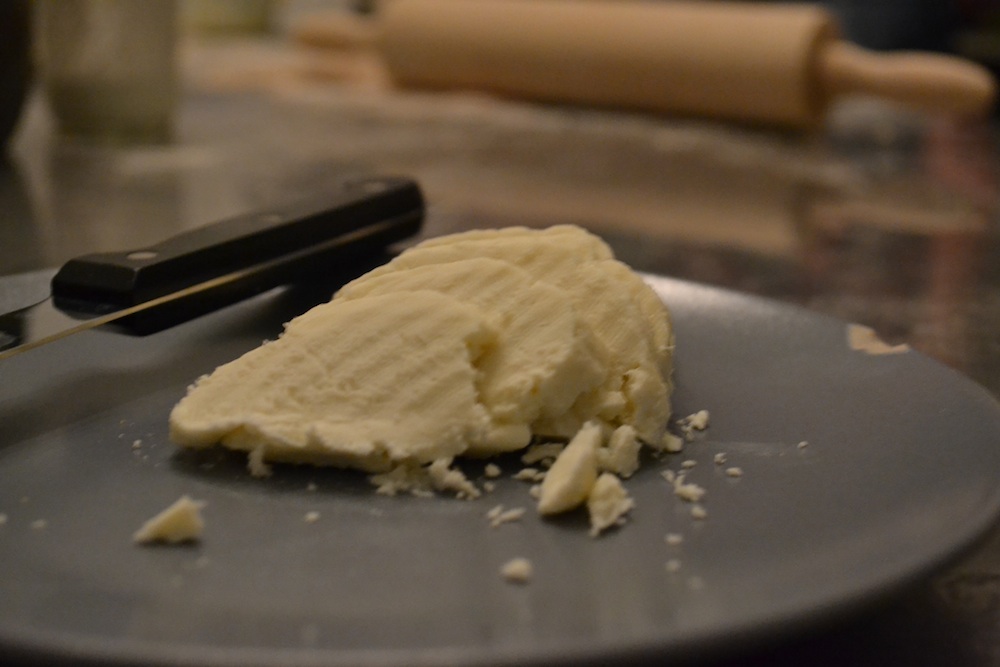
For the mozzarella I used the recipe in the book Home Dairy. I am a little, um...unruly in the kitchen and I tend to ignore most directions and just kind of wing it and see what happens. This isn't a great idea when making cheese, apparently.
-My first attempt: I tried organic milk which, it turns out, is a bad idea because it's ultra-pasteurized. No curds, no cheese.
-My second attempt: I used the microwave to heat up the curds. I had no idea our microwave even had a high setting, so this took me forever because my curds didn't reach that shiny, melty texture until I doubled the time. It worked, but the flavor suffered.
-My third attempt: I used the heated whey method and a mesh strainer instead of a slotted spoon, and my yield was about half of what it should have been. My curds were all mashed together because of the strainer and super liquidy when I ladled in the heated whey.
So don't be a fool. Follow the directions...unlike me.

I guess making pasta is a pretty common thing, but we had never ever attempted it.There was a thing or two for us to learn along the way.
-Our first attempt was to roll out the dough and cut it with a knife. We ended up with big, fat noodles that the kids called 'snakes'. Whatever, it was good and we ate it.
-Our second attempt involved buying a magazine for a coupon, then going next door to buy a pasta maker with the coupon, followed by about an hour of cleaning the machine out. We learned that your dough cannot be sticky at all to use the pasta maker. Our original recipe was very sticky, and we ended up adding about twice as much flour, which yielded way too much pasta. But it worked and it was so great. I mean, greater than any pasta I've ever had ever.


Fresh pasta with homemade mozzarella, tossed with homemade butter, olive oil, a clove of crushed garlic, sliced tomato, dried basil, salt and pepper. And you know we ate more of those brownies immediately after scraping the bottom of this bowl, right? Yeah, we totally did.
In an effort to simplify, we have complicated things temporarily. We made our own mozzarella and our own pasta and learned a lot during the experiments. We traded the crying baby back and forth, managed the behavior of two very unruly little girls all while mixing, boiling, hovering over thermometers...but we did it.
For the mozzarella I used the recipe in the book Home Dairy. I am a little, um...unruly in the kitchen and I tend to ignore most directions and just kind of wing it and see what happens. This isn't a great idea when making cheese, apparently.
-My first attempt: I tried organic milk which, it turns out, is a bad idea because it's ultra-pasteurized. No curds, no cheese.
-My second attempt: I used the microwave to heat up the curds. I had no idea our microwave even had a high setting, so this took me forever because my curds didn't reach that shiny, melty texture until I doubled the time. It worked, but the flavor suffered.
-My third attempt: I used the heated whey method and a mesh strainer instead of a slotted spoon, and my yield was about half of what it should have been. My curds were all mashed together because of the strainer and super liquidy when I ladled in the heated whey.
So don't be a fool. Follow the directions...unlike me.

I guess making pasta is a pretty common thing, but we had never ever attempted it.There was a thing or two for us to learn along the way.
-Our first attempt was to roll out the dough and cut it with a knife. We ended up with big, fat noodles that the kids called 'snakes'. Whatever, it was good and we ate it.
-Our second attempt involved buying a magazine for a coupon, then going next door to buy a pasta maker with the coupon, followed by about an hour of cleaning the machine out. We learned that your dough cannot be sticky at all to use the pasta maker. Our original recipe was very sticky, and we ended up adding about twice as much flour, which yielded way too much pasta. But it worked and it was so great. I mean, greater than any pasta I've ever had ever.


Fresh pasta with homemade mozzarella, tossed with homemade butter, olive oil, a clove of crushed garlic, sliced tomato, dried basil, salt and pepper. And you know we ate more of those brownies immediately after scraping the bottom of this bowl, right? Yeah, we totally did.
Monday, November 7, 2011
Oh my
As much as I love the gorgeous piece of machinery that is our new Kitchenaid mixer, I can certainly see a down side to owning it. It's just so easy, on a cloudy, chilly night like tonight, to think, "Oh, man, I want some brownies" and then just make some brownies.
Here's how it went down: I googled "brownie recipe". I saw "Best Brownies" recipe. Then, a few minutes and a messy flat beater later, I had a pan of brownies in the oven. And who could blame me? It's so easy.
But, earlier today, I saw a picture of homemade whipped cream and I was like, "I should make some homemade whipped cream." So while the brownies were baking, I pulled out the whisk attachment, stole a lil' bit of Carla's heavy cream she uses to make butter from the fridge, and whipped up a half batch of whipped cream. And, oh my, I have to say it was a fine decision.

You know I licked this thing clean one second after the picture was taken.

Just a bowl of whipped cream, waiting patiently.
This is too easy. You probably already know how to do this.
1. A cup of heavy cream goes into the bowl. Whisk it until it starts to get thick.
2. Drop in 2 tablespoons of powdered sugar and 1/4 teaspoon of vanilla extract.
3. Whisk until peaks start to form, but not too long or fast or you'll end up with butter. I whisked on 8 for about a minute and the results were perfect.

Oh my, yes.
Saturday, November 5, 2011
Whip it
Whipped butter in 4 minutes? Don't mind if I do.


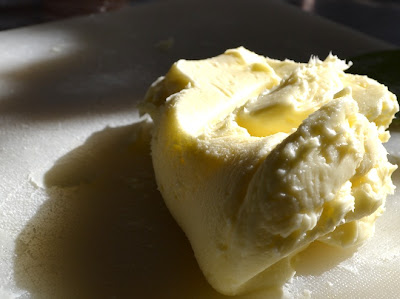


I don't know if you heard, but we won a KitchenAid mixer! I am already smitten with her beauty and power. She needs a name because I may love her more than the dog.
Butter
ingredients
1 pint heavy cream
directions
1. Mix heavy cream in stand mixer on medium speed for about a minute.
2. Bump up the speed to high for another 2 to 3 minutes.
It's ready when the butter forms together and buttermilk separates.
3. Strain butter from buttermilk.
4. Rinse butter until water runs clear.
5. Place butter on a cutting board and fold over and over pushing out the remaining liquid.
6. Refrigerate
Friday, November 4, 2011
Good Bacteria
For my birthday, six months ago, I bought the book Home Dairy by Ashleigh English. I read it cover to cover at least twice but didn't try a single recipe...until yesterday.
 Yogurt is so good for you and so easy to make. I cannot see us buying commercial yogurt ever again. Unless we eat everything up and need a new starter.
Below is exactly what I did as a novice yogurt maker, and our yogurt came out perfect. It was thick, and it balanced the tangy and sweet flavors wonderfully.

On the next go round, I may strain the yogurt in a cheese cloth for an even thicker consistency. I mixed in some peach butter with one serving and it was AMAZING!
Yogurt
ingredients
3 Cups 1% milk
2 Tablespoons honey-flavored Greek yogurt
directions
1. Heat milk in a double boiler until it reaches 180 degrees.
2. Pre-heat slow cooker on low.
3. Remove milk from heat and let cool to 110 - 115 degrees.
4. Stir in yogurt until well mixed.
5. Pour mixture into 3 jelly jars, seat lid and tighten rim.
6. Turn slow cooker off and place jars of yogurt inside and cover with lid.
7. Let sit overnight.
8. Refrigerate and eat. Use for up to two weeks.
One of the best parts of this process was explaining to our 7-year-old daughter the difference between good bacteria and bad bacteria. Her interpretation went something like this: "There are two kinds of bacteria. One is the kind that eats dead birds and one is in yogurt that we eat." I'll take that. If she one day wins a Nobel prize for her work with bacteria, I will look back on our first yogurt making days with a smile.

I highly recommend giving Ashleigh's book a read. I hope to try out butter and mozzarella cheese sometime this week!

Below is exactly what I did as a novice yogurt maker, and our yogurt came out perfect. It was thick, and it balanced the tangy and sweet flavors wonderfully.

On the next go round, I may strain the yogurt in a cheese cloth for an even thicker consistency. I mixed in some peach butter with one serving and it was AMAZING!
Yogurt
ingredients
3 Cups 1% milk
2 Tablespoons honey-flavored Greek yogurt
directions
1. Heat milk in a double boiler until it reaches 180 degrees.
2. Pre-heat slow cooker on low.
3. Remove milk from heat and let cool to 110 - 115 degrees.
4. Stir in yogurt until well mixed.
5. Pour mixture into 3 jelly jars, seat lid and tighten rim.
6. Turn slow cooker off and place jars of yogurt inside and cover with lid.
7. Let sit overnight.
8. Refrigerate and eat. Use for up to two weeks.
One of the best parts of this process was explaining to our 7-year-old daughter the difference between good bacteria and bad bacteria. Her interpretation went something like this: "There are two kinds of bacteria. One is the kind that eats dead birds and one is in yogurt that we eat." I'll take that. If she one day wins a Nobel prize for her work with bacteria, I will look back on our first yogurt making days with a smile.
I highly recommend giving Ashleigh's book a read. I hope to try out butter and mozzarella cheese sometime this week!
Thursday, November 3, 2011
Apple Butter
I was going to make applesauce, but I left it in the slow cooker a little too long...so now we have apple butter.
Apple Butter
ingredients
about 30 apples, peeled, cored and chopped.
2 Cups white sugar
1 Tablespoon cinnamon
1/4 teaspoon freshly grated nutmeg
directions
1. Place about 20 chopped apples in slow cooker with cinnamon and nutmeg
2. Cook on low for about 8 hours
3. Pour mixture into food processor and blend until smooth but not too liquidy
4. Add the remaining chopped apples and sugar to the slow cooker
5. Continue to cook on low for another 3 to 4 hours
6. Again, pour mixture into food processor and blend until smooth
7. Cool overnight in the refrigerator
8. The next morning, cook on low for another 6 to 8 hours with the lid half off to let the steam out
9. Sanitize jars and lids
10. Fill jars with warm apple butter, leaving about 1/4 inch of space at the top
11. Wipe the rims of the jars with a clean washcloth
12. Seat the lid and tighten the ring
13. Process in a water bath for 15 minutes
14. Lift them out of the canner and let sit undisturbed for 24 hours
I tend to process things longer than instructions call for because I'm a bit of a Nervous Nelly when it comes to canning. I'm still very much a novice and I don't need any botulism in my life.
Safety Tip: Make sure your lids are sealed by pressing in the center (gently) with your finger. If it bounces up and down it is not sealed. Refrigerate it (about a month) or freeze it (4 to 6 months)
Wednesday, November 2, 2011
Few & Cheap
When I look through recipes, I look for two things:
1. Few Ingredients
2. Cheap Ingredients

I have tried so many recipes over the years. Some recipes are fantastic but laborious. The ones that stick with me--the ones that become a part of our lives--are the ones that I can remember and that I can afford. So in an effort to keep our lives and meals simple, we collect and adjust recipes to fit our tastes, patience, and budgets.
Here is my favorite recipe, adapted from the back of a flour bag. I make this once or twice a week and it is unbelievably good.
Honey-Wheat Bread
Ingredients
2 packages regular active dry yeast
1/4 Cup Warm Water
3/4 Cup Honey
2 T Butter
2 teaspoons Salt
1 Cup Oats
3/4 Cup Flaxseed Meal
2 1/2 Cup Warm Water
4 Cup Whole Wheat Flour
2 to 3 Cup All-Purpose Flour
1 T Cooking Oil
Directions
1. Dissolve yeast in 1/4 Cup Warm Water.
2. Mix honey, butter & salt together in a large mixing bowl. Add 2 1/2 Cups warm water.
3. Beat in wheat flour, oats & flaxseed until moistened. Add in dissolved yeast, and stir with spoon.
4. Add all-purpose flour until dough pulls away from the side of the bowl and your dough is no longer sticking to your fingers. Knead dough 5 to 10 minutes on a lightly floured surface.
5. Cover dough with a towel and place in a lightly oiled bowl. Set in a warm spot *see tip below* to rise for about an hour.
6. After the dough has doubled in size, cut it in half. Grease two loaf pans and place dough in bread pans.
7. Cover dough with a towel and set in a warm spot for about 30-45 minutes.
8. Pre-heat oven to 375 degrees. Bake for 30 minutes. Reduce oven temperature to 350 degrees and bake for another 10 to 15 minutes or until loaves sound hollow when you tap on them. Let cool and enjoy.
Makes 2 beautiful loaves.
Tip *Heat 1 Cup of Water in Microwave for 60 seconds. Then place dough in microwave alongside your warm water. It's a perfect warm, moist place for your dough to rise and no little hands will come back and poke at it.*

Monday, October 31, 2011
And we're back!
It's been a little while since either one of us updated this blog, hasn't it? So sorry, we've been distracted.
Controlling gestational diabetes through diet is a commendable feat, and the fact that my wife did it with such fierce determination was truly impressive...but it kind of killed food for us for a time. You know what you eat when you're on a diabetes diet? Meat. So much meat.
I have a reformed vegetarian's pure and holy love of animal by-product, and we're beyond lucky to live close to Duma's meat market (where we were able to buy a 50-lb freezer pack of local meat), but chewing on sinew does get tiresome, especially when there are dietician-imposed limitations on what you can pair with your pound of flesh.
Good--no, great--news is that our little guy is here, he's healthy, and the gestational diabetes disappeared the moment they plopped him into our arms. We didn't jump right back into cooking, of course--having a newborn is a full-time job, so we lived off of pre-made, frozen meals for a few weeks. But, as the blog title up there suggests, we're back!
You know what you can't eat much of when you're diabetic? Bread, especially delicious, homemade, carb-tastic breads. So, since delivered of her temporary condition, my wife has been on a bread-making rampage. She took a bunch of pictures and has promised to write up a post here about pulling steaming loaves out of the oven, so I'll leave the delicious details to her, but suffice it to say we are in bread heaven right now--even the dog couldn't resist a cooling loaf and got himself banished to the back porch yesterday.
Our little family (well, we're not so little anymore...5 and counting) is rushing headlong toward one of the more ambitious goals we've ever had--self-sufficiency. Or less grocery store-sufficient, at least. We've been looking at farms and dreaming about the day we can have some acreage and a hobby farm of our own but, for now, we're struggling to make things grow out of a ground left soggy by a year of near-record rainfall. Tomatoes split and blighted, the cucumbers turned yellow right out the gate...disappointing, yes, but the broccoli did great, our Kentucky Wonder green beans kept our plates full all summer, jalapeños piled up faster than we could use them.
With frost setting in this week, though, we just weren't ready to watch our remaining crops freeze and die. So, taking a nudge from the ever-wonderful gardenfork.tv, we built a coldframe for our raised bed containing spinach, carrots, chives, and quinoa, and we got it on just in time--this week we saw two hard frosts, but the spinach didn't know what was going on outside and actually doubled in size.
 Peek-a-boo!

It's just some dollar furring strips, three half-inch pvc pipes, and some plastic sheeting--maybe $20 worth of stuff. You should build one for your raised bed, too:
Oh, and, OH! Big ups to food blog A Spicy Perspective, who ran a giveaway for a Kitchenaid mixer with some awesome attachments that we WON. The missus and I are beyond excited to get this lovely piece of awesome into our kitchen (we chose "pistachio" for color)--we are going to make so much good stuff with it.
Controlling gestational diabetes through diet is a commendable feat, and the fact that my wife did it with such fierce determination was truly impressive...but it kind of killed food for us for a time. You know what you eat when you're on a diabetes diet? Meat. So much meat.
I have a reformed vegetarian's pure and holy love of animal by-product, and we're beyond lucky to live close to Duma's meat market (where we were able to buy a 50-lb freezer pack of local meat), but chewing on sinew does get tiresome, especially when there are dietician-imposed limitations on what you can pair with your pound of flesh.
Good--no, great--news is that our little guy is here, he's healthy, and the gestational diabetes disappeared the moment they plopped him into our arms. We didn't jump right back into cooking, of course--having a newborn is a full-time job, so we lived off of pre-made, frozen meals for a few weeks. But, as the blog title up there suggests, we're back!
You know what you can't eat much of when you're diabetic? Bread, especially delicious, homemade, carb-tastic breads. So, since delivered of her temporary condition, my wife has been on a bread-making rampage. She took a bunch of pictures and has promised to write up a post here about pulling steaming loaves out of the oven, so I'll leave the delicious details to her, but suffice it to say we are in bread heaven right now--even the dog couldn't resist a cooling loaf and got himself banished to the back porch yesterday.
Our little family (well, we're not so little anymore...5 and counting) is rushing headlong toward one of the more ambitious goals we've ever had--self-sufficiency. Or less grocery store-sufficient, at least. We've been looking at farms and dreaming about the day we can have some acreage and a hobby farm of our own but, for now, we're struggling to make things grow out of a ground left soggy by a year of near-record rainfall. Tomatoes split and blighted, the cucumbers turned yellow right out the gate...disappointing, yes, but the broccoli did great, our Kentucky Wonder green beans kept our plates full all summer, jalapeños piled up faster than we could use them.
With frost setting in this week, though, we just weren't ready to watch our remaining crops freeze and die. So, taking a nudge from the ever-wonderful gardenfork.tv, we built a coldframe for our raised bed containing spinach, carrots, chives, and quinoa, and we got it on just in time--this week we saw two hard frosts, but the spinach didn't know what was going on outside and actually doubled in size.


It's just some dollar furring strips, three half-inch pvc pipes, and some plastic sheeting--maybe $20 worth of stuff. You should build one for your raised bed, too:
Oh, and, OH! Big ups to food blog A Spicy Perspective, who ran a giveaway for a Kitchenaid mixer with some awesome attachments that we WON. The missus and I are beyond excited to get this lovely piece of awesome into our kitchen (we chose "pistachio" for color)--we are going to make so much good stuff with it.
Wednesday, August 3, 2011
Basil & Blueberries
This past weekend we drove out to our favorite blueberry farm, Wintergreen Tree Farm, and three generations of our family picked somewhere close to 12 pounds of blueberries in about an hour and half. That's how long it took for the sun to melt our little ones into whiny exhausted tyrants. It was worth it. We brought 7.5 pounds of freshly picked blueberries into our kitchen and began rinsing, de-stemming and drying. Now we have two huge bags of blueberries lined up in the freezer that will make January not seem so dull. One bag we'll use for canning blueberry syrup and preserves the other will be nibbled on with oatmeal, cereal, and pancakes throughout the winter.

Basil is in and it is in abundance! While our little herb garden supplies us with enough to pick leaves here and there for meals, it certainly didn't provide enough to make anything wonderful like, pesto. However, my mother-in-law's herb garden is overflowing with giant basil... and she is a good sharer.


Here is my recipe for pesto:
- 1/2 cup walnuts
- 5 to 6 cloves of garlic
- 3 to 4 cups fresh basil leaves, packed
- 1 teaspoon sea salt
- 1 teaspoon freshly ground black pepper
- about 1 1/2 cups olive oil
- 1 cup fresh grated Parmesan
- 1/3 cup fresh chives
Saturday, July 30, 2011
Garden Day
We worked in the garden today and took some pictures.

Garden bed two has a lovely assortment of...


We've made do with our quarter acre, which has meant getting creative with space, like when we put corn by the driveway...

or enabled a stray pumpkin vine in its attempt to take over the front porch.

Here's some basil from the herb garden, just because I think basil's sexy.

And, finally, here's a shovelful of gorgeous compost.

Let's start with some broccoli, green beans, and round two of both peas and zucchini, shall we?


cucumbers...

lettuce...

tomatoes...

and peppers.
And here are some potatoes, onions/chives, and a lonely--but resilient--carrot.

This little guy keeps watch over the plants. You may know we bought him from Target's toy department, but the birds don't and they stay clear of his rubber wrath.

We've made do with our quarter acre, which has meant getting creative with space, like when we put corn by the driveway...

or enabled a stray pumpkin vine in its attempt to take over the front porch.

Here's some basil from the herb garden, just because I think basil's sexy.

And, finally, here's a shovelful of gorgeous compost.

Friday, July 29, 2011
Backyard cuisine
Hey there! Been awhile, I know, but I wrote a novel and that takes a little bit of time, you know?
Here's what we ate with dinner last night. It's pan-fried potatoes with minced garlic and fresh basil and thyme.
 The potatoes were from the garden--we pulled some the other night and they were perfect, pink new potatoes. The herbs? From the herb garden, right outside the kitchen door. We bought the garlic--we don't grow our own garlic because our weird neighbor grows garlic and we don't want him to talk to us about growing garlic. But the rest was all backyard grown, and that's not too shabby, right?
The best part was pitching the dish to our beyond-picky six-year old daughter. It went something like this:
Me: Would you eat potatoes if I fried them in a pan?
Daughter: No
M: Are you sure?
D: Yes
M: They're from the garden.
D: (pauses) Okay then.
D: (few minutes later) Dad? Can you fix these for Thanksgiving dinner? They. Are. Awesome!
Now, I'm no great cook, am only now coming to the realization that you can toss herbs into a meal to give it that "flavor" thing people are always raving about. Watching her scarf those potatoes down and ask for more made me feel like friggin' Jamie Oliver or something, though.
More important than her enjoying a side dish, however, was her responding to the fact that the potatoes came out of our garden--she helped plant those potatoes, checked on them every day with us, and pulled them out of the ground just the day before. We're growing food together. Every day without fail, she runs out and gathers berries, even eating green beans raw--she doesn't eat green beans, but she'll gobble down a bean that she pulled off the plant. That, to me, is something important. She's realizing that food doesn't come from Wal Mart but from the ground, and anybody--even her barista dad--can make food come out of dirt. How far are we gonna take this? I'm not completely sure, but I do know that we're nowhere near the end of the life lesson. I mean, the tomatoes are still green and I think we can coax a few more inches out of those cucumbers.
Here's what we ate with dinner last night. It's pan-fried potatoes with minced garlic and fresh basil and thyme.
The best part was pitching the dish to our beyond-picky six-year old daughter. It went something like this:
Me: Would you eat potatoes if I fried them in a pan?
Daughter: No
M: Are you sure?
D: Yes
M: They're from the garden.
D: (pauses) Okay then.
D: (few minutes later) Dad? Can you fix these for Thanksgiving dinner? They. Are. Awesome!
Now, I'm no great cook, am only now coming to the realization that you can toss herbs into a meal to give it that "flavor" thing people are always raving about. Watching her scarf those potatoes down and ask for more made me feel like friggin' Jamie Oliver or something, though.
More important than her enjoying a side dish, however, was her responding to the fact that the potatoes came out of our garden--she helped plant those potatoes, checked on them every day with us, and pulled them out of the ground just the day before. We're growing food together. Every day without fail, she runs out and gathers berries, even eating green beans raw--she doesn't eat green beans, but she'll gobble down a bean that she pulled off the plant. That, to me, is something important. She's realizing that food doesn't come from Wal Mart but from the ground, and anybody--even her barista dad--can make food come out of dirt. How far are we gonna take this? I'm not completely sure, but I do know that we're nowhere near the end of the life lesson. I mean, the tomatoes are still green and I think we can coax a few more inches out of those cucumbers.
Sunday, July 10, 2011
Wait... Reverse that

It has been a while since anything new has gone up on this blog, and for good reason. Early last week we were hit with some news that greatly affects the way we eat. My gestational diabetes test came back showing some pretty high numbers. I spent three hours with a dietician last Friday and relearned how to eat, at least for the next few weeks. This will change the dynamic of our little blog temporarily... but I'm hoping that the change will also teach me a few things about measuring ingredients and appropriate serving sizes... things that I have been blatantly ignoring.
Today the Mr. did a grocery run like no other. Instead of hovering over the ingredients list on the labels, he compared grams of carbohydrates... something I for one have never done. It turns out all those beautiful organic options in the grocery are way higher in carbs than the other foods. All of summers' colorful vibrant fruit that I've been consuming at a rapid rate, is not a great option when your placenta keeps loads of sugar in your blood. Desserts, muffins, breads... um, yeah... those are going to have to wait a while before they make a comeback into our home.
The biggest change in the diet is the protein. We admittedly don't eat a lot of meat. Now I will be consuming meat 14 times in a 7 day span. This to me.... sounds awful and completely counterintuitive to a natural whole foods diet that I usually try to stick by. It is what it is, and I will do whatever I need to in order keep myself and my little baby inside healthy and safe.

As I flip through the books and guides, I am finding that some things remain true. Herbs. Herbs change a meal into something you remember. Herbs are great for your body inside and out and herbs are naturally delicious. Luckily, our herb garden has been good to us this year.

I have a few recipes that I'm working on posting this week. They will be very diabetic friendly and hopefully they will taste awesome and you will love them.
Subscribe to:
Posts (Atom)