Thursday, March 29, 2012

Kale Chips


Sometimes my kids will not even consider putting a food in their mouth based solely on how it looks. So when they dug right into kale chips I was pretty floored. They love them. They chant for them. They declare them better than potato chips. The moment I put them on their plates they are devoured.


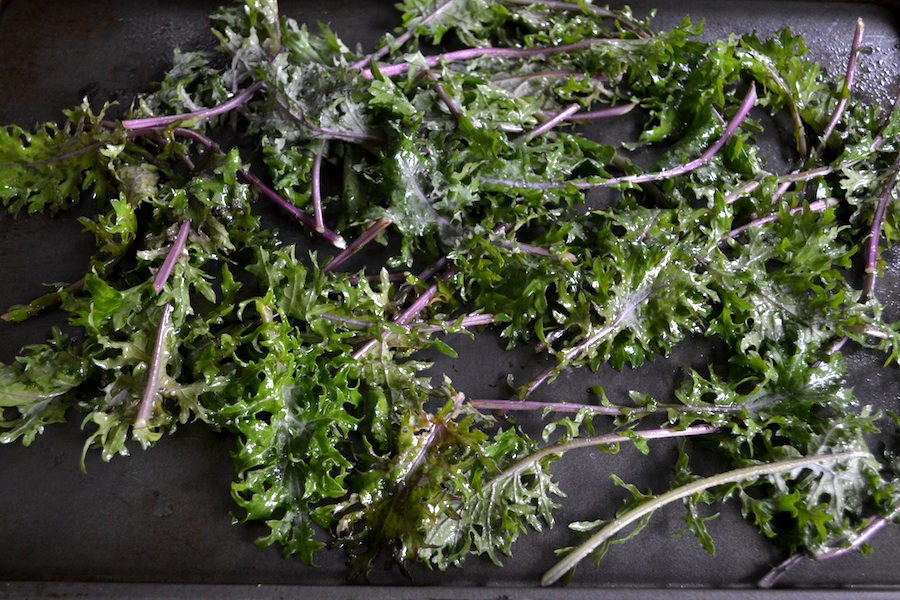
I pick up bags of kale at the farmer's market on Saturday's. Matt at Birdsong Farm has an inspiring little stand stocked with spinach, kale, salad mix, and dried beans. He has red russian kale and white russian kale, which is apparently better for cooking kale chips because of the thicker stems, according to Matt. Who knew? Well we do.... at least now. But, I stick with the red russian kale because I don't want to mess up the good thing we have going on here.

Here is what I used:
A bunch of red russian kale
1 Tablespoon apple cider vinegar
2 Tablespoons extra virgin olive oil (you could get away with using less)
salt, a hefty pinch
a freezer bag
a baking sheet
some canola oil spray
fresh grated parmesan cheese

Here is what I did:
Pre-heat oven to 300 degrees
I rinsed my kale really well. Kale is like spinach, it grows close to the ground, so an extra little wash isn't going to kill the taste.
Toss the kale in a freezer bag with apple cider vinegar, extra virgin olive oil and some salt. Smash it around until all the leaves are coated.
Spray the baking sheet with a non-stick spray.
Lay the kale out on the baking sheet so nothing is overlapping... at least not too much anyway.

Bake for 15 minutes. Give it a little stir. Bake for another 10-15 minutes, depending on your crispy preference. We like super crunchy kale so I bake it for the full 30 minutes, sometimes even 35.
Sprinkle with a bit more salt and some fresh grated parmesan cheese.


Serve hot. 
Kale is also delicious in soups and salads, and since technically we are in cool weather season (at least for today in Northeast Ohio)  kale is in season right now. So buy it, cook it, preserve it and eat it up!

Enjoy!

Wednesday, March 21, 2012

Homemade Chocolate Chip Ice-Cream


It's 84 degrees in Northeast Ohio. Why not? I mean sure bathing suit season is right around the corner, but instead of worrying about, well... anything. Enjoy this day. This beautiful warm spring day. Have a (small) bowl of ice-cream.

Here is what I used:
3 Cups Cream
1 Cup Half-n-Half
2 Tablespoons Vanilla Extract
3/4 Cups White Sugar
About a handful of semi-sweet chocolate chips
A saucepan
Electric Ice Cream Maker
Glass Bowl and Plastic Wrap
Container with Lid
(Recipe inspired by Basic Vanilla Ice-Cream Recipe from the book Home Dairy by Ashleigh English)


Here is what I did:
In a saucepan warm the half-n-half and cream over medium heat until little bubbles appear around the edges of the pan.
Remove from heat.
Stir in sugar until completely dissolved.
Pour mixture into a glass bowl and let it cool a bit.
Then stir in your vanilla extract.
Cover with plastic wrap and refrigerate over night.
The next morning pour mixture into electric ice cream maker and when the ice-cream starts to pull together and look nice and fluffy pour in your chocolate chips.
Process the ice-cream according to your machines directions. Ours starts to putter and act like it is choking on something.
Spoon your ice-cream into a container with a lid and place in the freezer for 6 to 8 hours. This recipe makes about a quart.
Enjoy after a yummy chili dinner and then go back outside and putter around your yard.

Enjoy!

Sunday, March 18, 2012

Bread

We eat bread.

We do not eat bread at every meal, or even every day of the week.  We eat bread because life is too short to deny yourself the warm crusty goodness of fresh baked bread...and from what I have learned about denial, it always comes back to bite you in the ass later anyway.

Bread is one of the oldest foods. It has kept generations of families from starving to death. It is simple. It makes me feel GOOD and that is very important. I want to eat healthy, make good choices for my family and I want to enjoy every little piece of the process that goes into feeding my children.

I make a big batch of bread every 7-14 days depending on how things are going. Sometimes I make bread for the shop. But mostly, I make it for us. I mix two really great recipes & methods together to do what we do. One is the famous No-Knead Bread Recipe and the other comes from the book Artisan Bread in 5 minutes a Day. I highly recommend this book. It is full of great bread recipes and methods.  By using recipes and methods for both I get a simple bread that is easy for my little ones to chew and the adults still get the yummy crust we crave.

Here is what I use:

12.7 Qt plastic bin with lid
6 Cups cold water
3 Tablespoons active dry yeast
3 Tablespoons salt
13 Cups of flour
cast iron dutch oven
(recipe from Artisan Bread in 5 minutes a Day)

Here is what I do:
First, I pour 6 Cups of cold water into the bin, then I add the yeast and salt and give it a little stir.
Then I add 13 Cups of flour and stir it a bit, just to coat all the flour.
Next I plop the lid on top, but I do not close it up tight. Let the dough rise overnight.


The next morning I preheat my oven to 450degrees. I put the dutch oven in while the oven preheats.
Next I pull off about a grapefruit size mess of dough and work some flour into it. Sprinkle the top with flour, then work the flour in by folding it under over and over again. Cut some slits in the top. I let the dough rest while the oven preheats.

Once the oven is preheated I lightly dust the bottom of the dutch oven with flour or cornmeal (whatever I am in the mood for) and then place my dough in. Put the lid on.
Bake for 25 minutes.
After 25 minutes I take the lid off and let it bake for another 12-15 minutes. This varies depending on the size of the dough I use.
I slide the bread out using a long wooden spoon and place the warm bread on a cooling rack to rest for about an hour before cutting into it.
Store the dough in the refrigerator. I have left mine in there chilling for up to 2 weeks.  


This recipe makes about 8 loaves of bread. The loaf size is perfect for a family of 4-5 to enjoy with dinner or with eggs at breakfast. We use it for sandwiches, french toast, as a little dessert when we spread some apple butter over it. It's super easy. And it's super delicious.


Enjoy!

Sunday, March 4, 2012

How to Make Yogurt

We have a few things we make on a regular basis. When we are lucky we can knock it all out on a calm Sunday morning. Most of it will last our family of 5 about a week.

Yogurt, granola, 'mother' batch for bread, mozzarella, butter, buttermilk, and sour cream.


Our 7 year old swears that 'mama yogurt' is the best she has ever eaten and scrunches her nose up at commercial yogurts. (WIN)

Here is the math:
$6.18 for a gallon of organic milk
$1.00 for 5.3 oz of greek yogurt
= 0.45 cents for 16, 8 oz jars of homemade yogurt


Here is what I use:
4 Cups milk
3 T of greek yogurt
double boiler
thermometer
4 - 8oz jelly jars with lids & bands
crockpot

Here is what I do:
1. Pour a bit of water in the bottom pan of your double boiler and 4 cups of milk in the top pan, set to a medium heat.

2. Preheat crockpot.
3. Place a thermometer in the milk and heat to 180degrees.


4. Remove milk pan from heat and let it cool to 110degrees.


5. Spoon 3 T of greek yogurt in a medium mixing bowl and whisk in your milk.


6. Pour milk mixture evenly into jelly jars. Place lid and screw bands on.


7. Place jelly jars in preheated crockpot.


8. Turn crockpot off and let the yogurt sit overnight or for about 8 hours.
9. Label and refrigerate.


The yogurt stays good for about 2 weeks, but it never lasts that long at our house.

Enjoy!